Permissions & Safety
Permissions are the most common early blocker when setting up ACT. This page helps you choose the right permission strategy and configure it.
What permissions does ACT need?
Section titled “What permissions does ACT need?”ACT workflows use several tools that require explicit permission:
| Tool | Used by | Why |
|---|---|---|
Bash | Git commands, Flutter CLI, project scaffolding | Runs shell commands for builds, tests, and git operations |
Read | All workflow skills | Reads specs, plans, source files |
Write | Spec, plan, work commands | Creates spec files, plan files, and source code |
Edit | Work, refine-spec commands | Modifies existing files |
Glob / Grep | Spec, plan, refine-spec commands | Searches codebase for patterns and conventions |
Supported clients gate these tools differently. Claude Code and OpenCode expose tool permission files. Codex uses config.toml for sandbox/approval settings and .rules files for command rules. Cursor also supports a global ~/.cursor/permissions.json for terminal and MCP allowlists, with auto-run mode controlled in the UI.
If you need a quick comparison of current ACT behavior by client, see Platform Support.
Which strategy should I choose?
Section titled “Which strategy should I choose?”AI coding agents run shell commands, read and write files, and search your codebase on your behalf. That’s what makes them powerful — but it also means you need to decide how much autonomy to give them and what boundaries to put in place.
The key tradeoffs to consider are:
- Safety vs friction: Tighter permissions mean more manual approvals. Looser permissions mean fewer interruptions but more trust in the agent.
- Local access: If you need to run apps on iOS Simulator, Android emulators, or physical devices, you need a strategy that runs natively on your machine — not inside a container.
- Prompt injection risk: When an agent browses the web or reads untrusted input, malicious content could try to hijack its behavior. Stronger isolation (containers, non-sudo accounts) limits the blast radius if this happens.
With that in mind, here are three approaches — from most conservative to most permissive:
| Strategy | Client support | Safety | Setup effort | Simulators / emulators | Friction |
|---|---|---|---|---|---|
| Permission rules / interactive approvals | All supported clients | High | Low | Full access | Some prompts initially |
| DSP / yolo + non-sudo account | Claude Code and Codex | Medium | Medium | Full access | None |
| Docker container | Best documented for Claude Code, OpenCode, and Codex | Highest | High | Limited | None |
Strategy 1: Permission rules
Section titled “Strategy 1: Permission rules”The most common approach. You pre-configure which tools, commands, or sandbox behavior your AI client is allowed to use, and it runs without prompting for those actions.
For Claude Code, OpenCode, and Codex, you can run /permissions in an active session to be guided through setting your desired permissions. This command writes your choices to the client’s permissions file.
Add tool permissions to your project’s .claude/settings.json:
{ "permissions": { "allow": [ "Bash(git *)", "Bash(flutter *)", "Bash(dart *)", "Bash(node *)", "Bash(gh *)", "Read", "Read(~/.pub-cache/**)", "Write", "Edit", "Glob", "Grep" ], "deny": [ "Edit(~/.pub-cache/**)" ] }}For Flutter projects, this also grants read-only access to ~/.pub-cache, which many apps need for dependency resolution and tooling.
Add tool permissions to your project’s opencode.json:
{ "$schema": "https://opencode.ai/config.json", "permission": { "bash": { "git *": "allow", "flutter *": "allow", "dart *": "allow", "node *": "allow", "gh *": "allow" }, "read": "allow", "edit": { "*": "allow", "~/.pub-cache/**": "deny" }, "glob": "allow", "grep": "allow", "external_directory": { "~/.pub-cache/**": "allow" } }}For Flutter projects, this also grants read-only access to ~/.pub-cache, which many apps need for dependency resolution and tooling.
Codex permissions are configured with config.toml and command rules:
Relevant files:
- User-level config:
~/.codex/config.toml - Trusted project config:
.codex/config.toml - User-level rules:
~/.codex/rules/ - Trusted project rules:
.codex/rules/
Cursor’s closest equivalent is a global per-user ~/.cursor/permissions.json file:
{ "terminalAllowlist": [ "git", "flutter", "dart", "node", "gh" ]}To make this work reliably for ACT, open Cursor Settings > Agents, then set Auto-Run Mode to Use Allowlist:
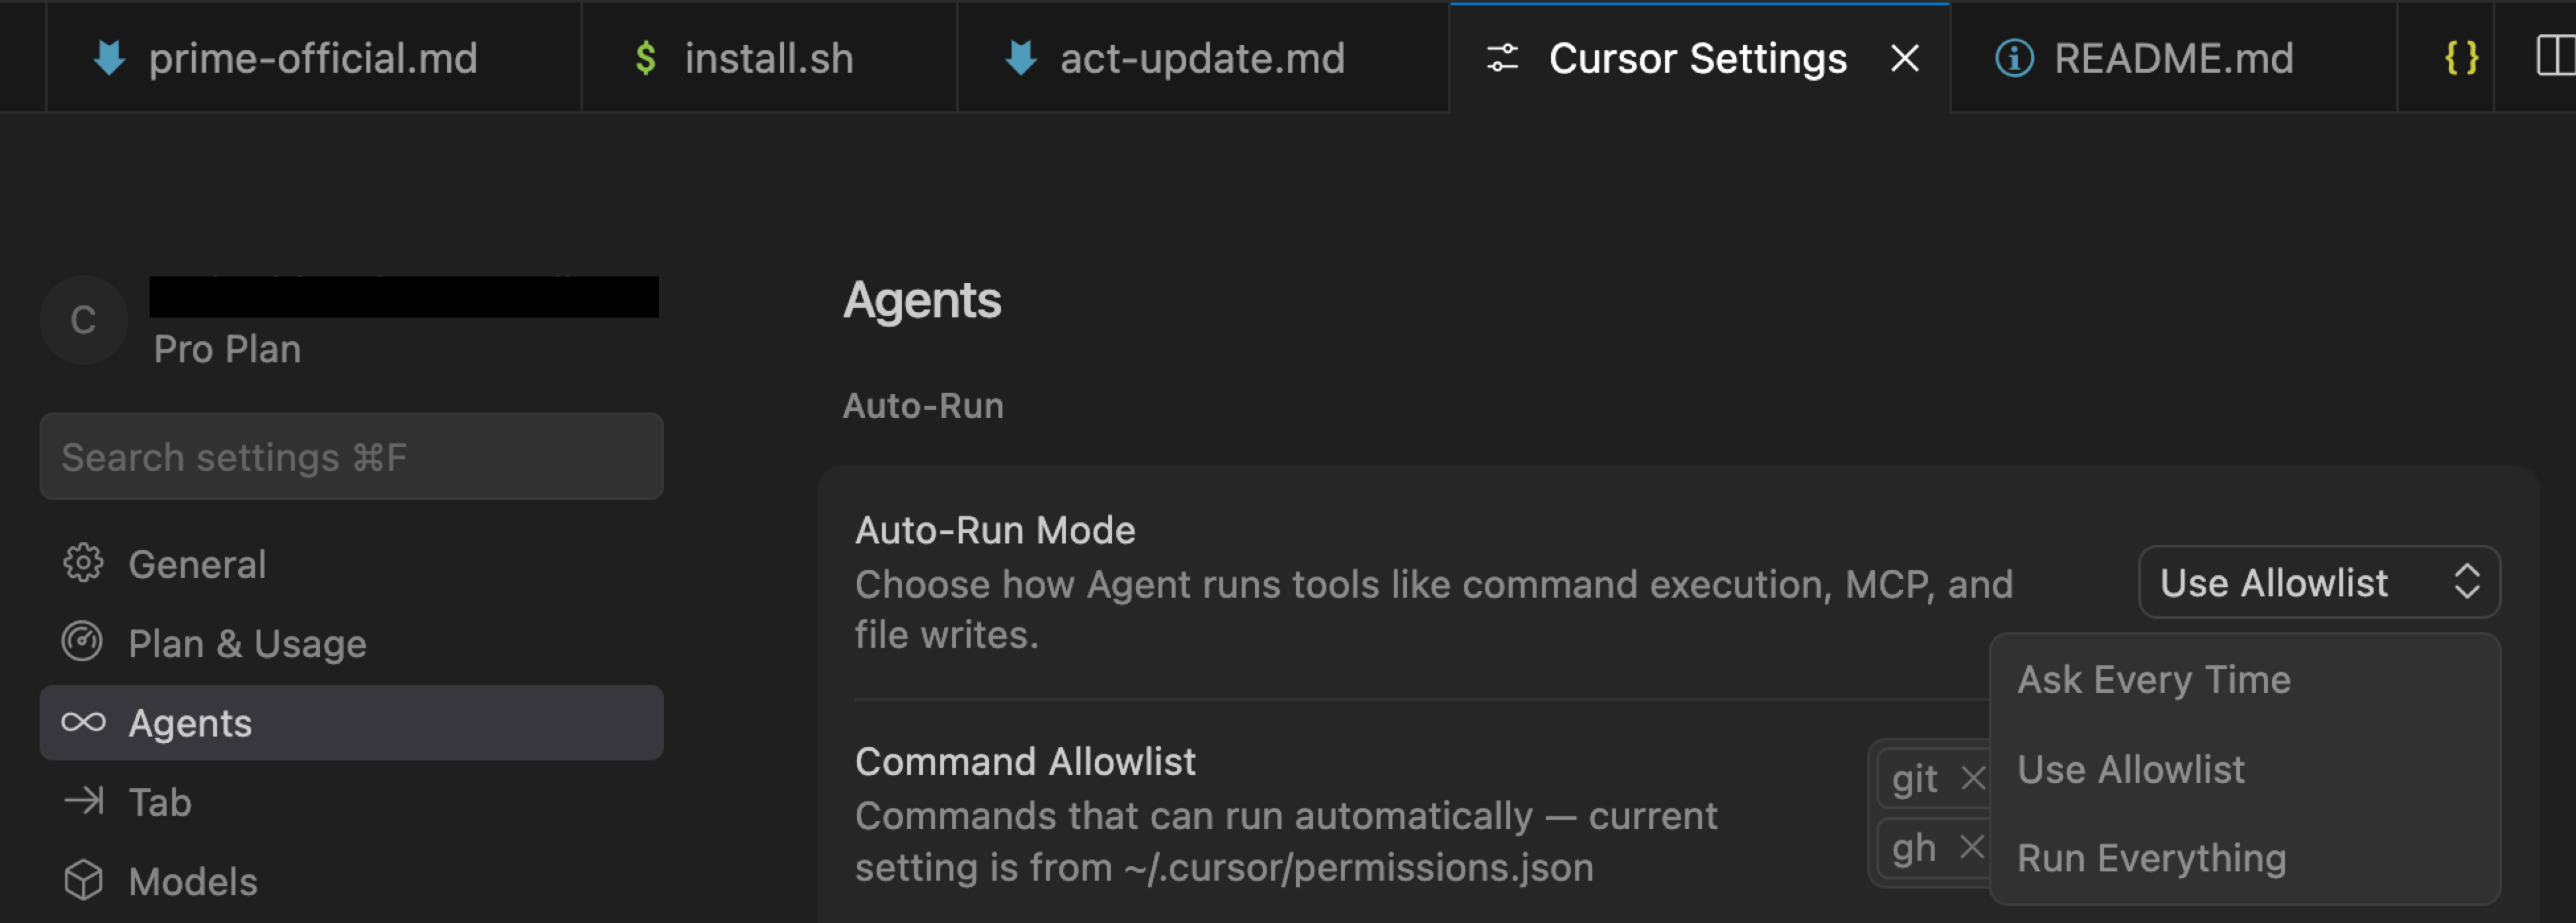
Notes:
- Do not use
Ask Every Time, since Cursor ignores allowlists in that mode - Do not use
Run Everythingif you wantpermissions.jsonto limit commands, since it skips Cursor’s safety checks - Save the file at
~/.cursor/permissions.json(global only, no project-level override) - Install ACT with
./scripts/install.sh --tool cursor - Reload Cursor, open Agent chat, and type
/act-
This persists terminal approvals across sessions when using Use Allowlist and is the closest Cursor equivalent to the Claude Code and OpenCode examples above.
Cursor also supports an mcpAllowlist, but ACT’s current Cursor setup does not require one by default. Cursor’s built-in read/write/search tools are governed by auto-run mode rather than permissions.json, so this is not a perfect one-to-one mapping with the other clients.
For current Cursor docs, see:
This reduces or eliminates repeated approval prompts while still blocking unexpected shell commands.
Project-level vs global permissions
Section titled “Project-level vs global permissions”Claude Code, OpenCode, and Codex support both project-level and global (user-level) config files. Cursor’s allowlist file is global only:
| Project config | Global config | |
|---|---|---|
| Claude Code | .claude/settings.json | ~/.claude/settings.json, or ${CLAUDE_CONFIG_DIR}/settings.json when set |
| OpenCode | opencode.json | ~/.config/opencode/opencode.json |
| Codex | .codex/config.toml | ~/.codex/config.toml |
| Cursor | Not supported | ~/.cursor/permissions.json |
For Claude Code, OpenCode, and Codex, project-level settings override global settings when they conflict. A good pattern is to set your ACT permissions globally so they apply everywhere, then tighten per-project if needed. Codex only loads project .codex/ config and rules when the project is trusted.
Advantages:
- Easy to set up — one config file (or global for all projects)
- Full access to local simulators and emulators
- Granular control over which commands are allowed
Disadvantages:
- You may still get occasional prompts for commands not in your allow list
- Requires maintaining the allow list as your workflow grows
Learn more here:
- Configure permissions — Claude Code
- Permissions — OpenCode
- Config basics — Codex
- Rules — Codex
- permissions.json reference — Cursor
- Cursor Agent overview
Strategy 2: DSP / yolo mode on a non-sudo account
Section titled “Strategy 2: DSP / yolo mode on a non-sudo account”Dangerously Skip Permissions (DSP) mode in Claude Code and yolo (full access) mode in Codex disable normal permission checks, giving the agent full autonomy. To mitigate the risk, you run it under a dedicated non-sudo user account that has no access to sensitive data.
claude --dangerously-skip-permissionscodex --yoloThis is ideal for developers who want zero-friction AI development with full access to native tooling (iOS Simulator, Android emulators, etc.).
Advantages:
- Zero permission friction — Claude Code or Codex runs completely autonomously
- Full local dev setup with simulators and emulators
- Ideal for AI-assisted development and manual testing side by side
Disadvantages:
- Requires setting up a separate user account on your machine
- Some residual risk from prompt injection — if the agent performs web searches, malicious content on websites could attempt to hijack the session. The non-sudo boundary limits the blast radius, but doesn’t eliminate it entirely.
Strategy 3: Docker container
Section titled “Strategy 3: Docker container”Run your AI client inside a Docker container or devcontainer for maximum isolation where that workflow fits your setup. Any prompt injection or unintended commands can only affect the container — your host machine stays safe.
Resources:
- Tutorial: Run AI agents inside a devcontainer
- Ready-made Flutter devcontainer
- Codex secure devcontainer example
Inside the container, you can safely use DSP mode (Claude Code), full access mode (Codex), or pre-configure permission rules (OpenCode) since the container itself is the security boundary:
claude --dangerously-skip-permissionscodex --yoloAdvantages:
- Strongest isolation — prompt injection attacks can only affect the container, not your host machine
- Safe to use DSP / yolo mode inside the container
- Reproducible, shareable environment
Disadvantages:
- iOS Simulator: Not available (requires macOS host)
- Android Emulator: Requires additional setup for hardware acceleration passthrough
- Visual testing: You can’t easily see the app UI running inside the container
- Higher setup effort compared to local strategies
Troubleshooting
Section titled “Troubleshooting”Repeated permission prompts
Section titled “Repeated permission prompts”If you keep getting prompted for the same tools every time you start a new session, your permissions likely are not persisted in the way your client expects.
- Claude Code: Accepting a permission interactively writes it to
.claude/settings.json, so it persists across sessions. If you’re still being prompted, check that the file exists in your project root and that the tools appear inpermissions.allow(notpermissions.deny). - OpenCode: Selecting “Always Allow” only lasts for the current session — it is not written to disk. To persist permissions, you must manually add them to
opencode.jsonas shown in Strategy 1 above. - Codex: Check
~/.codex/config.toml,.codex/config.toml,~/.codex/rules/default.rules, or.codex/rules/. Project.codex/config and rules only load for trusted projects, and.rulesfiles are loaded at startup, so restart Codex after editing them. - Cursor: Use
Use Allowlistif you want~/.cursor/permissions.jsonto control which terminal commands can auto-run. InAsk Every Timemode, Cursor ignores the allowlists. InRun Everything, Cursor skips safety checks, sopermissions.jsonis not an effective limiter. If the file is missing, invalid, or does not defineterminalAllowlist, Cursor falls back to the in-app allowlist.
For Claude Code, OpenCode, and Codex, the fix is usually to add the permissions you need to your config file (project-level or global) so they are loaded automatically at startup. For Cursor, use Use Allowlist and persist the terminal allowlist in ~/.cursor/permissions.json.